
November 9, 2026
Explore: Style
How to Measure Your Chest Size (Men): Body vs Garment
How to measure chest size for men: where the tape goes, how snug to pull it, pit-to-pit garment widths, and how to read a maker's size chart.
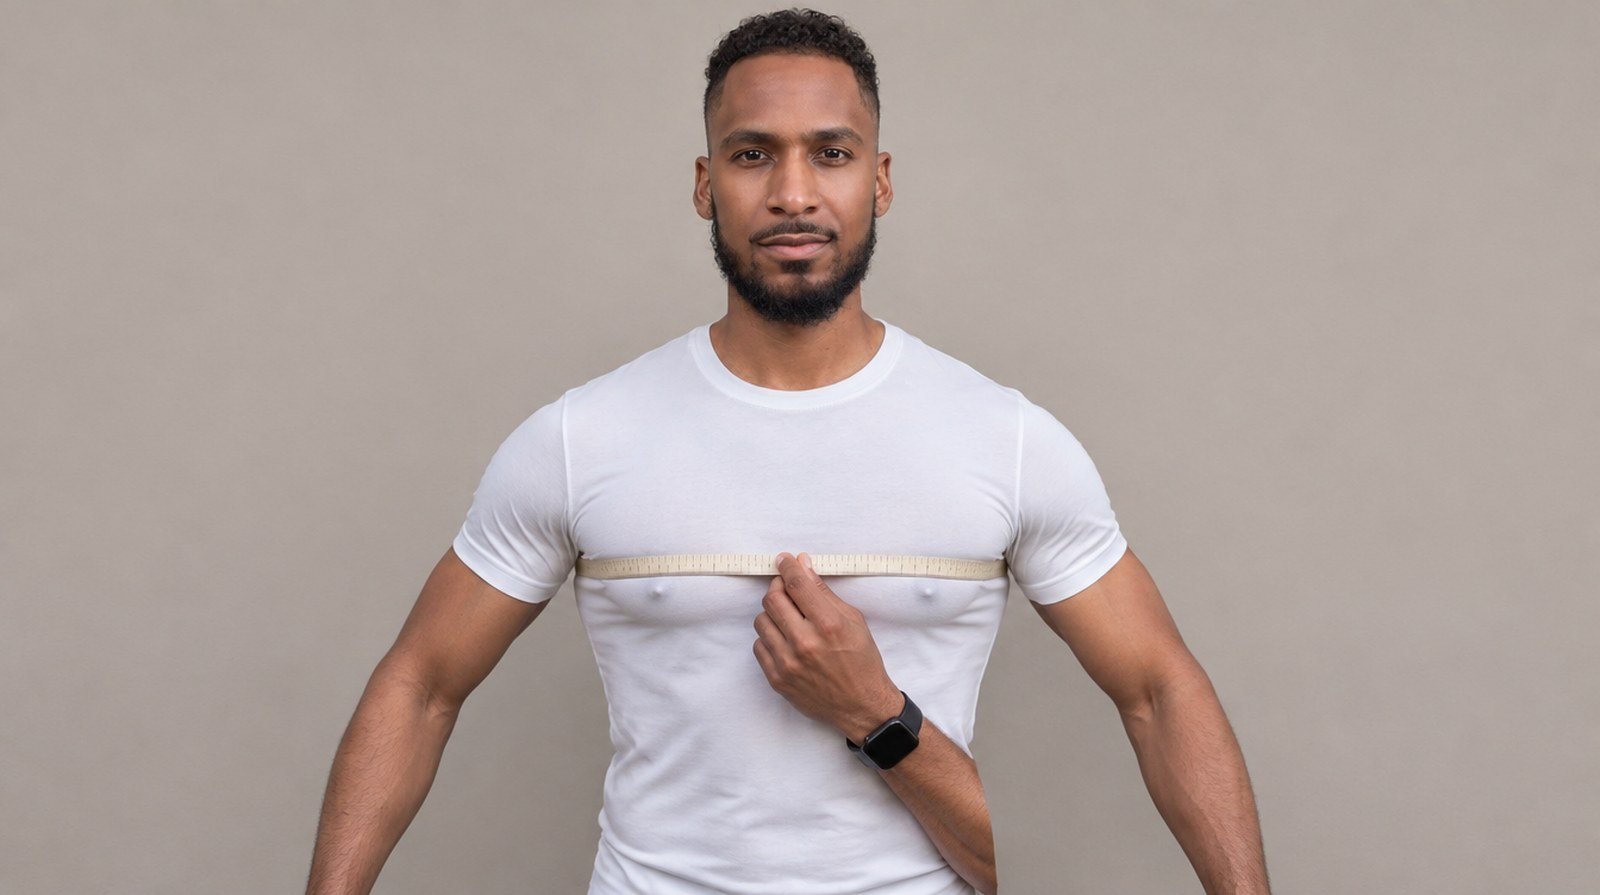
Most fit mistakes with tops start with one number taken the wrong way. If you’re looking up how to measure chest size as a man, you’ll find two very different instructions online: wrap a tape around your body, or lay a shirt flat and measure across it. Both are correct. They just measure different things, and mixing them up is how a “large” ends up tight across the chest or hanging off you like a tent.
This guide goes deep on the chest. It covers where the tape goes on your body, how firm to pull it, what to wear, how to do it alone, how to measure a garment you already own, and how to read a maker’s size chart without comparing the wrong numbers. Our Size & Fit Reference covers every measurement at a glance; this is the detailed chest companion to it.
Short answer: Stand relaxed with your arms at your sides. Pass a soft tape under your arms, around the fullest part of your chest and across your shoulder blades, keep it level, and hold it snug without pressing in. Read it on a normal breath. That’s your body chest. A garment’s chest is different: lay it flat and measure pit to pit. Compare that flat width with a chart that lists flat widths, and double it only when you need to compare it with a circumference. Compare body numbers with body charts and garment numbers with garment charts.

Body Chest vs Garment Chest: Know Which Number You Need
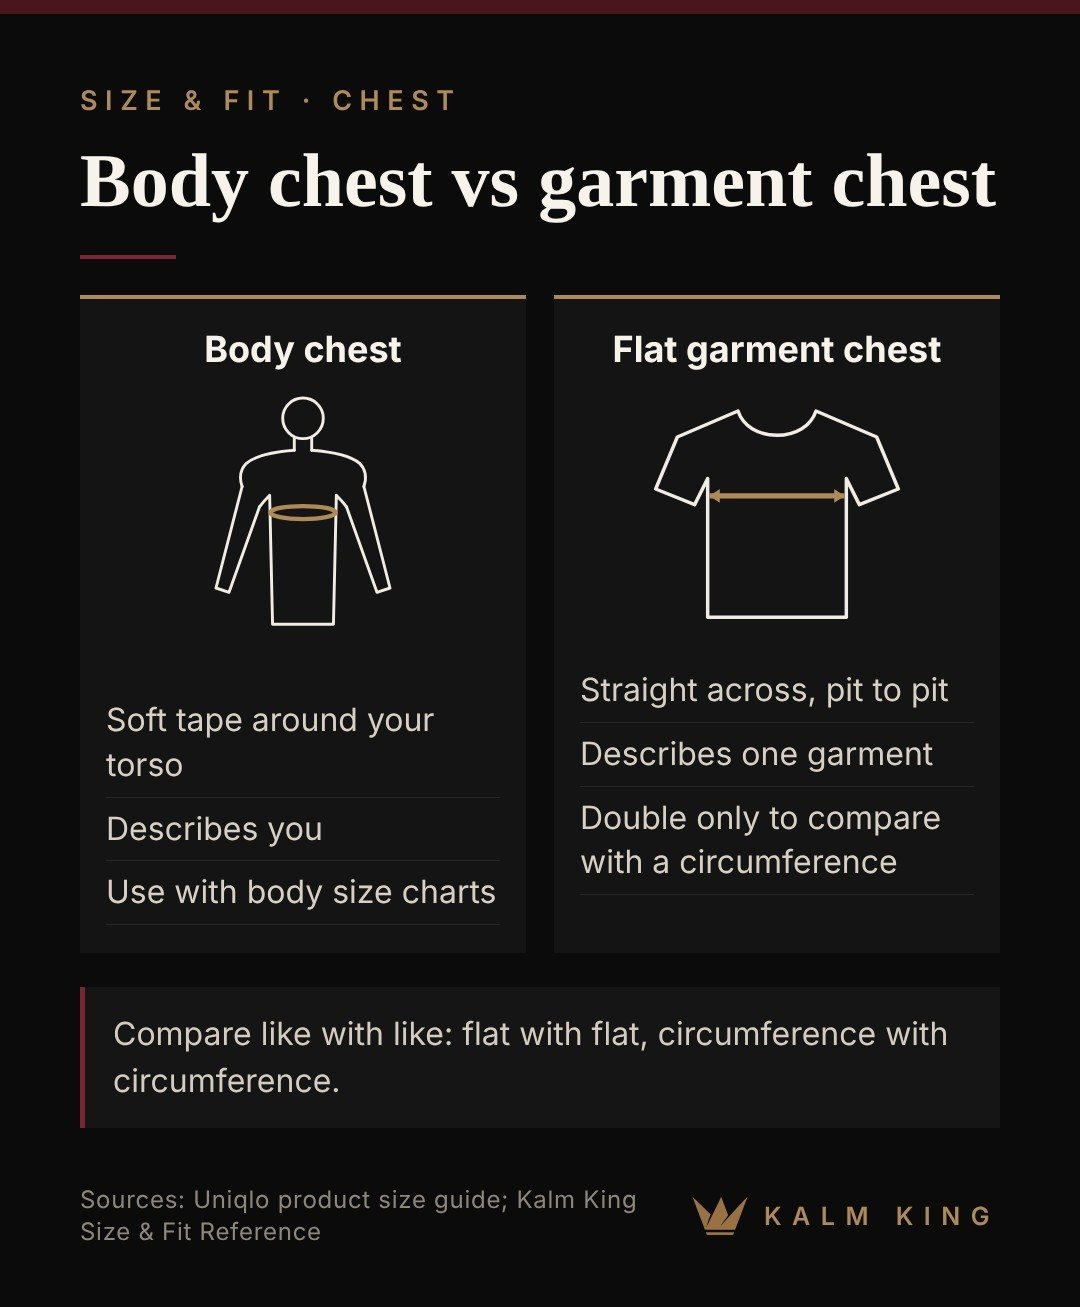
Before you pick up a tape, decide which kind of number you’re after. There are three, and our hub page defines them the same way.
- Body chest. The distance around your body, taken with a soft tape. It describes you, not any shirt.
- Flat garment width. A straight line across the front of a garment laid flat, often called pit to pit on a tee, and sometimes listed as “half chest.” It describes roughly half of the garment.
- Garment circumference. The distance all the way around the garment. On a top, it’s roughly double the flat width.
Makers use all three, and they don’t always label them clearly. A garment chart may list flat widths or full circumferences, and the two look very different: a flat chest number is about half the size of a circumference for the same shirt. Uniqlo’s customer service page spells out the split better than most: it describes “Body Size” as your actual body measurements and “Product Size” as the measurements of the finished garment. It then warns that the product size chart “should not be compared directly with your body measurements.” Pactimo, a cycling apparel maker, says something similar at the top of its men’s chart: “These are body measurements, not garment dimensions.”
That’s the core rule. Know which number a chart is giving you, and compare like with like.
Why the two numbers usually differ
The gap between your body chest and a garment’s chest circumference is usually called ease. Most everyday shirts and tees are cut larger than the body so they move with you, but how much larger depends on the cut and the fabric. A relaxed or oversized tee is built with plenty of room on purpose. A slim tee follows your body more closely. And a garment with plenty of stretch, such as a compression top or a close-fitting athletic layer, can measure about the same as your body, or even smaller, because the fabric is meant to stretch to fit. That’s why two shirts with the same size label can measure differently across the chest, and why your body chest alone can’t tell you how a specific shirt will feel.
How to Measure Chest Size (Men): Step by Step
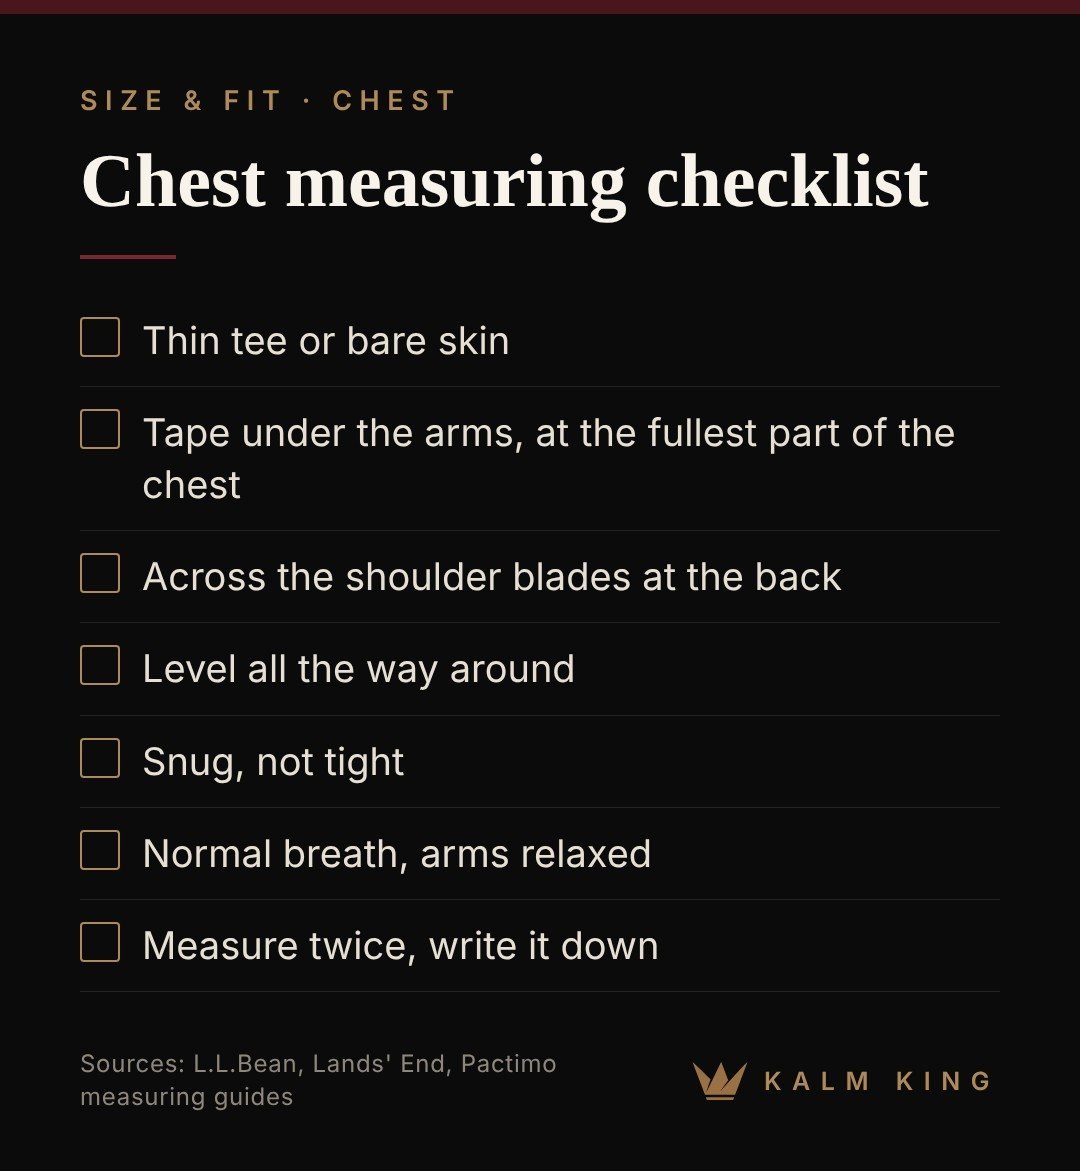
The instructions from major makers line up closely. L.L.Bean’s men’s size guide says to “Measure just under arms and across shoulder blades holding tape firm and level.” Lands’ End’s men’s tops guide says, “With arms relaxed at your sides, measure over the fullest part of your chest and shoulder blades, keeping the tape parallel to the floor.” Pactimo’s guide adds: stand naturally, breathe normally, and keep the tape “snug without pressing into your body.”
Here’s how to put those together in practice. One rule sits above all of them: if the brand you’re buying from gives its own measuring instructions and they differ from these, follow the brand’s. Its size chart was built from its own method, so your number should be taken the same way.
1. Get the right tape
Use a soft, flexible tape measure, the cloth or vinyl kind used for sewing and tailoring. Pactimo specifies a soft measuring tape. A metal tape from a toolbox won’t wrap around a body properly and will give you a poor reading. If you don’t own a soft tape, see the string method further down.
2. Wear the right thing
What’s between the tape and your skin changes the number. Pactimo says to measure “over close-fitting clothing or directly against your skin.” Lands’ End goes further, recommending you measure over the undergarments you’ll wear with the purchase, “not over your outer clothing.”
So for tees, shirts and most tops, measure on bare skin or over a thin, close-fitting tee. Take off the hoodie, the sweater and the jacket. A thick layer adds bulk the tape will count as you.
3. Stand naturally
Stand up straight but relaxed, feet comfortably under you, arms hanging at your sides. Lands’ End and Pactimo both specify arms relaxed at your sides. Don’t flex, don’t puff your chest out, and don’t hunch. You want the shape your chest has when you’re just standing there, because that’s the shape you’ll be wearing the shirt in most of the day.
4. Place the tape under your arms
Lift your arms a little to pass the tape around your back, then bring it under your armpits and around to the front. L.L.Bean puts the tape “just under arms.” Pactimo describes “passing the tape under your arms and across your back.” Once it’s in place, lower your arms back to your sides. Measuring with your arms raised stretches the tissue around your chest and can change the number.
5. Find the fullest part of the chest and the shoulder blades
Lands’ End and Pactimo both say to measure around the fullest part of your chest. L.L.Bean and Lands’ End both say to go across the shoulder blades at the back. In practice, the tape sits high under the arms, crosses the broadest part of your chest at the front, and passes over the shoulder blades behind you. If you’re not sure where the fullest part is, slide the tape up and down a little and note where the reading is largest.
6. Keep it level
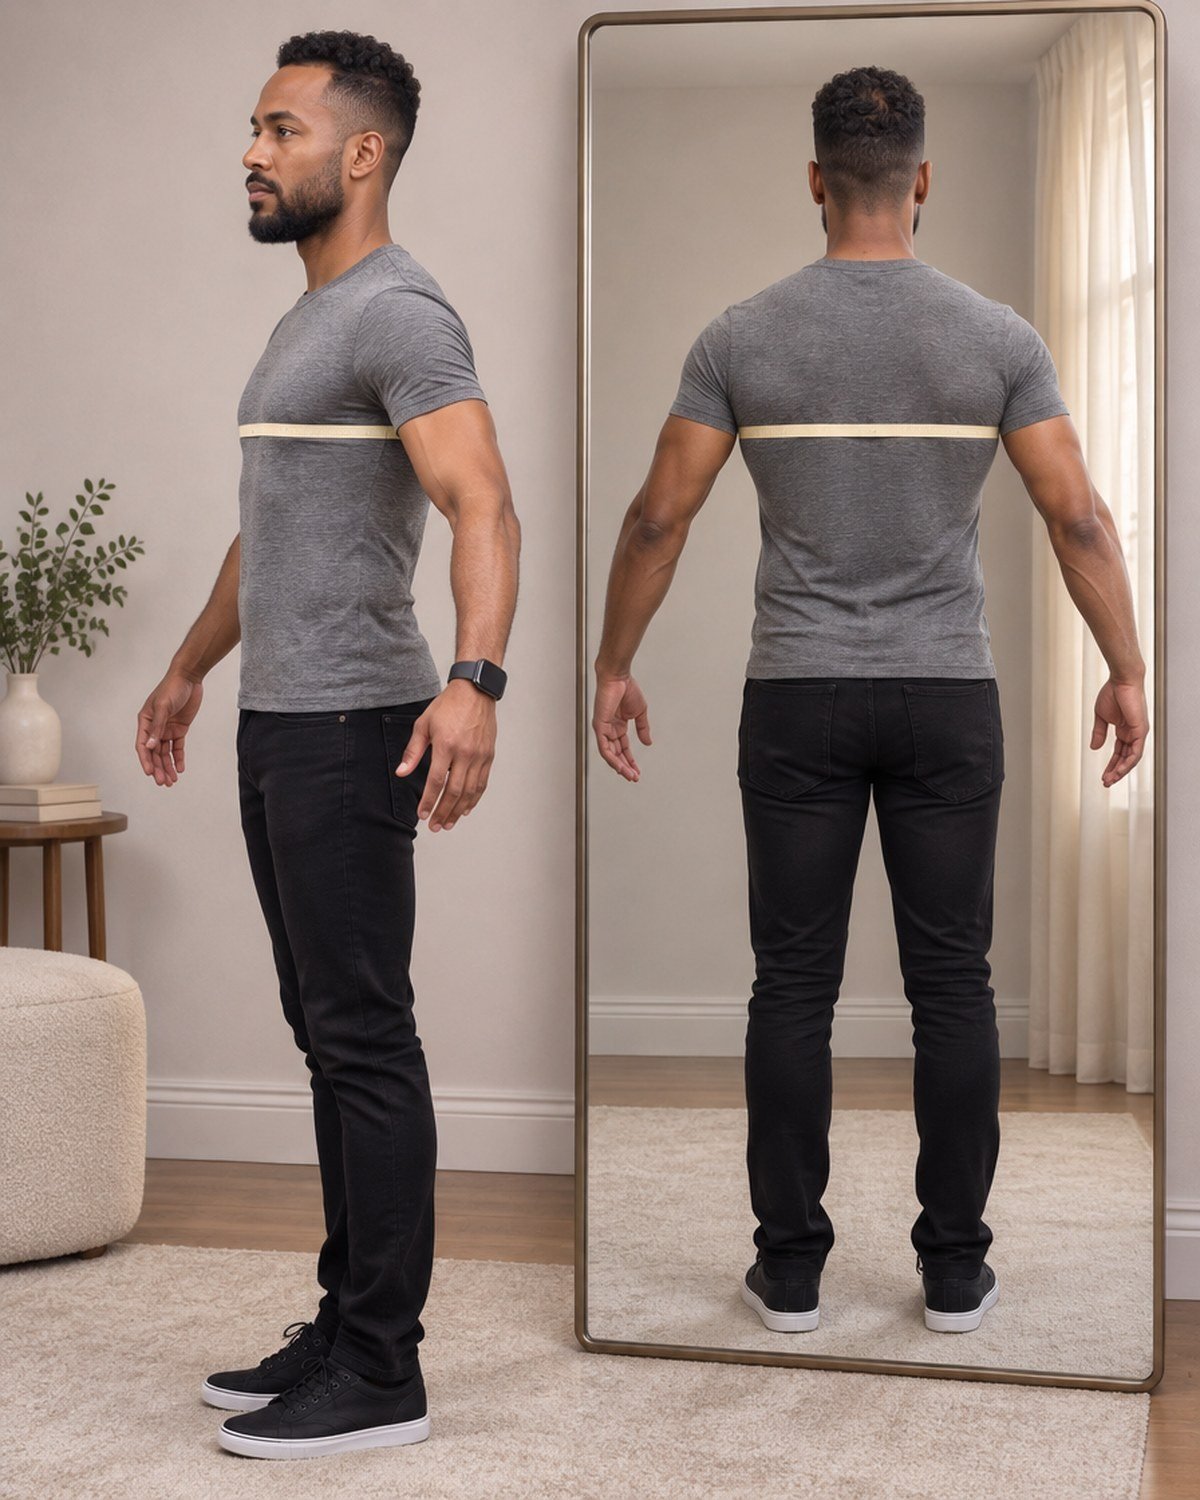
This is the step people get wrong most often when measuring alone. L.L.Bean says to hold the tape “level.” Lands’ End says “parallel to the floor.” The front of the tape is easy to see, but the back tends to drop toward your waist or ride up toward your neck. A tape that dips in back measures a different, often larger, part of your torso. Check it in a mirror, or have a helper look.
7. Snug, not tight
L.L.Bean says to hold the tape “firm.” Pactimo says snug “without pressing into your body.” Those two instructions describe the same target from opposite sides. The tape should lie flat against you all the way around with no slack and no twist, but it shouldn’t dig in or squeeze. If you see the tape creasing your skin, ease off. If it’s hanging loose anywhere, take up the slack.
8. Breathe normally and read the number
Pactimo says to “breathe normally.” Don’t take a deep breath and hold it, and don’t empty your lungs. Relax, breathe, and read the tape where the zero end meets the rest of it. You’ll see some makers and tailors ask for a breath in to leave extra room, so guidance isn’t completely uniform. For comparing yourself to a maker’s body chart, a normal breath gives you the number closest to how you actually stand and wear clothes.
9. Write it down, then repeat
Record the number straight away, with the unit and the date. Then take the tape off and measure again. If the two readings are close, you’re done. If they’re far apart, something moved: the tape dropped in back, you held your breath, or the tension changed. Measure a third time and keep the reading that matches one of the first two.
Measuring Your Chest Alone vs With Help
You can measure your own chest. It’s just easier to do well with a second pair of hands. Lands’ End’s guide opens with “If possible, get a friend to help.” The reason is mostly the back of the tape: you can’t see it, and it’s the part that slips.
If you have help
Stand naturally with your arms at your sides and let the other person do all the work. They can stand behind you to place the tape over the shoulder blades, then come around to the front to check the fullest part of the chest and read the number. Ask them to check the tape is level all the way around before reading. You stay still and breathe normally.
If you’re on your own
A few habits make a solo measurement more reliable:
- Use a mirror. Turn sideways and look over your shoulder to check the back of the tape.
- Start at the front. Hold the zero end against your chest, pass the tape around your back, and bring it to meet the zero end at the front, where you can read it.
- Lower your arms before reading. Pass the tape around with your arms slightly raised, then drop them to your sides before checking the number.
- Use your thumbs, not your fists. Pinch the overlap lightly between thumb and finger so you don’t pull the tape tighter while reading.
- Measure two or three times. Solo readings vary more, so repeat until two agree.
No tape? Use a string
If you don’t have a soft tape, a string can stand in. Outdoor Equipped, a men’s clothing retailer, describes the workaround: wrap a piece of string around the body part, mark it with a marker, then “use the ruler to measure from the end of the string to the mark you made.” It adds that holiday ribbon can work in a pinch, but that you’re better off buying a tailor’s tape “so your measurements are precise.”
For the chest, wrap the string in the same position as a tape: under your arms, around the fullest part of your chest, level and snug. Mark the point where it meets the end, then lay it flat along a ruler or a rigid tape measure. Pick a string or ribbon that doesn’t stretch, keep it from slipping as you mark it, and repeat the measurement.

How to Measure Chest Size on a Garment
Your body chest tells a size chart about you. A garment measurement tells you about one specific shirt. The most useful garment to measure is one you already own and like the fit of.
Pit to pit, step by step
- Use a clean, dry garment. Measure it the way you normally wear it, after it’s been through your usual wash and dry.
- Lay it flat. Button or zip it if it closes, place it front side up on a table or bed, and smooth out wrinkles without pulling the fabric.
- Find the armpits. Locate the point where each sleeve seam meets the side of the body.
- Measure straight across. Run the tape horizontally from one armpit point to the other, just below the armholes. That’s the flat chest width, or pit to pit.
- Note how it fits. Next to the number, write a few words: “fits close,” “a bit roomy,” “good for layering.”
Uniqlo’s product measurement guide describes the same thing in one line, defining body width as “The length from armpit to armpit,” and lists chest or body width “(Measure flat)” among the measurements that “Determine overall looseness or tightness.” Its tip for shoppers is to measure a similar item you already own: “Lay the garment flat and measure its chest width and body length.”
One detail to watch: not every brand measures at exactly the same spot. Some measure right at the armpit; some measure a set distance below it. Our guide to how a men’s t-shirt should fit notes this, and it’s worth checking a brand’s measuring diagram before you compare your shirt to theirs.
When to double a flat width, and when not to
If a brand’s chart lists flat chest widths, or “half chest,” compare your shirt’s pit-to-pit number with it directly. No doubling needed: flat against flat.
Double only when you need a circumference: to compare your shirt with a chart that lists full garment circumference, or to compare the garment with your body chest. A flat measurement covers the front of the garment, so doubling it estimates the full distance around. Here’s an illustration with simple math, not a measurement of any real shirt: a tee that measures 21 inches pit to pit is roughly 42 inches around the chest. In metric, 53 cm pit to pit is roughly 106 cm around.
That doubling is an estimate, not an exact figure. Our hub calls the result “roughly double a flat width” for good reason. The back panel of a shirt may not match the front exactly, side seams take up a little room, and a knit like jersey can relax or stretch slightly as you smooth it. Treat the doubled number as a good guide, not a precise spec.
Working out the room you have
Once you have a garment circumference, you can compare it with your body chest to see how much room that shirt gives you. Another illustration with made-up numbers: if your body chest is 39 inches and your favorite tee is roughly 42 inches around, that tee gives you about 3 inches of room through the chest. That’s a number you can use. The next time a brand lists a flat chest width, compare it with your favorite tee’s flat width, and you’ll know whether you’re looking at more room, less, or about the same. If the brand lists a circumference instead, double your tee’s flat width first.
That comparison, garment against garment, is often the most reliable way to shop online. It skips the guesswork about how much ease a maker built into each size.
How to Read a Maker’s Size Chart
A size chart is only useful once you know what it’s measuring. Before you compare anything, work out which kind of chart you’re looking at.
Step 1: Is it body or garment?
Look for the label. Some charts say it outright. L.L.Bean’s men’s charts are titled “Men’s Regular Body Measurements.” Lands’ End’s UK size guide describes its charts as “body measurement charts.” Pactimo’s says “These are body measurements, not garment dimensions.” Uniqlo publishes both, a body size chart and a product size chart, and tells you to use the body size chart when selecting a size.
If a chart doesn’t say, look at the numbers and the measuring diagram:
- A chest number close to your own body chest, with a diagram of a tape around a person, is likely a body chart.
- A chest number around half your body chest, with a diagram of a flat shirt and a line across it, or a label such as “half chest,” is likely a flat garment width.
- A chest number near or above your body chest, with a diagram of a garment, may be a garment circumference. Stretch pieces can list a circumference close to, or below, a body chest, so check the diagram.
When it’s still unclear, check the brand’s help page or ask customer service. It’s a fair question, and the answer changes how you read every number on the chart.
Step 2: Match your number to the right column
- Body chart: compare your body chest.
- Flat (pit-to-pit or half-chest) garment chart: compare the pit-to-pit width of a shirt you like, as it is. Don’t double it.
- Garment circumference chart: double your favorite shirt’s pit-to-pit width and compare, or set the chart’s own number against your body chest to judge the room.
Step 3: Expect ranges and gaps
Many body charts give a range per size rather than a single number. On L.L.Bean’s regular chart, for example, a Small covers a 34 to 36 inch chest and a Medium covers 38 to 40 inches. Lands’ End’s UK shirts chart uses the same 34 to 36 and 38 to 40 inch ranges for Small and Medium. Notice what falls between them: if your chest measures 37 inches, neither range contains you. That’s normal, and it’s where your other measurements and your fit preference decide the size.
Don’t assume every brand handles in-between sizes the same way. L.L.Bean’s chart gives “If between sizes, order next larger size” in its waist instruction, not its chest instruction. Pactimo says that if your measurements fall into different sizes, contact its support team with your measurements and the product name. Read each maker’s own advice rather than carrying one rule from brand to brand.
Step 4: Allow for small variations
Finished garment measurements can vary slightly from the listed dimensions. Uniqlo notes that its product measurements may vary slightly by design and fabric, “with a possible difference of approximately 1–2 cm.” If you’re right on the edge of a size, that variation is one more reason to check other measurements before deciding.
Every size chart is the maker’s own
Sizes aren’t standardized from brand to brand. One maker’s Medium can be another’s Small. Always use the chart for the exact product you’re looking at, and don’t carry a size from one label to another without checking the numbers. Kalm King doesn’t publish its own size chart in this guide; the ranges above belong to the brands named.

Why Chest Alone Doesn’t Pick Your Size
The chest is a primary measurement for tops, but it’s not the only one. A shirt can match your chest perfectly and still fit badly somewhere else.
Uniqlo’s guide lists four measurements that most affect how a top feels and looks: shoulder width, which affects how the product sits across the shoulders; chest or body width, which determines overall looseness or tightness; body length, which affects where the item falls; and sleeve length, which affects comfort and proportion. Chest is one of four.
Shoulders
The shoulder seam is where most shirts either look right or don’t. If you choose a size by chest alone and your shoulders are broad for your chest, the seam can pull up onto the top of your shoulder. If your shoulders are narrow, it can slide down your arm. Our piece on why the shoulder changes everything explains why that seam position matters so much. For a garment, measure shoulder seam to shoulder seam on a shirt you like.
Waist
Your chest and waist don’t always fall in the same size. Pactimo tells shoppers to compare both chest and waist for jerseys and tops. A man with a broad chest and a narrow waist may find a shirt that fits his chest billows at the stomach. A man whose waist is larger relative to his chest may find a shirt that fits his chest pulls across the middle. In both cases, the cut of the shirt, slim, regular or relaxed, matters as much as the size.
Length and sleeves
Body length and sleeve length vary between brands even within one size. If the chest and shoulders fit but the length doesn’t, the answer is often a tall or long size from the same maker, not the next size up. A bigger size adds chest and shoulder width along with the length.
Your preference
Finally, fit isn’t only numbers. Two men with the same chest can want different amounts of room. Write down how your favorite shirts feel, not just what they measure. That note is often what separates two sizes that both technically fit.

Common Chest Measuring Mistakes
Most bad chest numbers come from a handful of small errors. Check for these.
- Measuring over a sweater or jacket. Thick layers add bulk. Measure on skin or a thin, close-fitting tee, as Pactimo and Lands’ End advise.
- Letting the tape drop in back. A tape that slopes down toward your waist at the back measures the wrong line. Keep it level, as L.L.Bean and Lands’ End both specify.
- Pulling too tight. A tape that digs in gives you a smaller number than your real chest. Snug, not squeezing.
- Leaving it too loose. Slack gives you a bigger number. The tape should lie flat against you all the way around.
- Holding a big breath. It inflates the number. Breathe normally.
- Flexing or puffing out your chest. It changes your shape. Stand naturally with your arms at your sides.
- Measuring with arms raised. Lower your arms before you read the tape.
- Twisting the tape. A twisted tape won’t lie flat and can throw off the reading. Check it at the front and back.
- Comparing a flat width with your body chest. A 21-inch pit-to-pit width doesn’t mean a shirt is too small for a 40-inch chest; it’s roughly half a circumference. Compare it with a flat-width chart or a shirt you own measured flat, and double it only when the comparison is with a circumference.
- Stretching a garment while measuring flat. Smooth it out, but don’t pull it wider than it sits.
- Using a tool tape or a stretchy cord. A rigid metal tape won’t follow your body, and an elastic cord stretches. Use a soft tape or a non-stretchy string.
- Measuring once. Repeat until two readings agree.
When to Re-Measure Your Chest
Your chest measurement isn’t a number you take once and keep forever. Re-measure when:
- Your weight has changed. Gaining or losing weight, or a period of strength training, can change your chest.
- It’s been a while. If you can’t remember when you last measured, measure again before an important purchase.
- You’re buying something with less room. Slim cuts, fitted shirts and tailored pieces leave less margin for an old number.
- Your favorite shirts feel different. If shirts that used to fit now feel tight or loose across the chest, check whether it’s you or the shirt. A cotton tee can lose width in the wash; our guide on how to prevent a t-shirt from shrinking covers why.
- You’re buying for someone else. Use a recent measurement, or measure a shirt of his that fits well. Our guide on how to buy clothes for him without guessing covers the rest.
When you re-measure a garment, use the same one you measured before if you can. That way you’ll know whether the shirt changed, or your preference did.
Inches and Centimeters
Size charts come in both units, sometimes on the same page. One inch is exactly 2.54 centimeters. To convert inches to centimeters, multiply by 2.54; to go the other way, divide by 2.54.
A couple of worked examples, using simple arithmetic: a 40-inch body chest is 101.6 cm, and a 53 cm pit-to-pit width is about 20.9 inches. Rounding to one decimal place is plenty for clothing.
Two cautions. First, converting units doesn’t convert sizes. A chest number in centimeters still has to be checked against the specific maker’s chart. Second, stick to one unit when you compare. Mixing an inch reading with a centimeter chart is an easy way to choose the wrong size. Our hub has a quick inches and centimeters converter if you want to check a number.
Record Your Numbers on Your Fit Card
A measurement you can’t find later isn’t much use. Once you have your numbers, put them somewhere you’ll see them when you shop.
Our Fit Card on the Size & Fit page has a place for each of the chest numbers in this guide. Your body chest goes under “My body,” the measurements taken with a tape around you. Your favorite tee’s flat chest, along with its shoulder, body length and sleeve, goes under “Clothes that fit me,” the measurements taken flat. There’s also space to note how you like things to fit and which brands and sizes have worked for you.
The card saves in your browser only and isn’t sent anywhere. You can print it, or clear it whenever you like. Add the date each time you measure, so you’ll know when it’s time to check again.
Bringing It Together
Your chest measurement is really two measurements. Your body chest is taken with a soft tape under your arms, around the fullest part of your chest and across your shoulder blades, level, snug and on a normal breath. A garment’s chest is taken flat, pit to pit. Body charts want the first number. Flat garment charts want the second as it is; circumference charts want it doubled. The gap between your body chest and a garment’s circumference is the room that shirt gives you, and for stretch pieces that gap can be small or even below zero.
Measure twice, write your numbers down, and check the chart for the exact product you’re buying. Then look past the chest to the shoulders, waist and length, because the size that fits your chest is only the starting point.
If you want fit notes like this in your inbox, join Field Notes.
Measuring for trousers too? Our guide on how to measure your inseam covers body and garment methods.
Related: what a heavyweight t-shirt is, since fabric weight and cut change how a chest measurement feels in wear, and whether polyester shrinks if your tees are synthetic blends.
Frequently asked questions
Where exactly should the tape go to measure a man's chest?
Pass a soft tape under your arms, around the fullest part of your chest and across your shoulder blades, keeping it level all the way around. L.L.Bean and Lands’ End both describe this placement, and Lands’ End and Pactimo both say to keep your arms relaxed at your sides.
Should I breathe in when I measure my chest?
For a body size chart, breathe normally rather than holding a deep breath, as Pactimo’s guide advises. Holding your breath inflates the number, and a normal breath reflects how you actually stand and wear clothes.
Is pit-to-pit the same as chest size?
No. Pit to pit is a flat width across the front of a garment, roughly half its circumference, while your body chest is the distance all the way around you. Compare it as it is with a chart that lists flat or half-chest widths, and double it only when you’re comparing it with a circumference.
Can I pick my shirt size from my chest measurement alone?
Not reliably. Chest is a key measurement for tops, but shoulder width, waist, body length and sleeve length also affect fit, and size ranges differ by maker, so check the specific product’s chart and compare a shirt you already like.
Sources
- Men’s Size Charts (L.L.Bean for Business) (manufacturer, commercial)
- Men’s Size Charts: Tops (Lands’ End UK) (manufacturer, commercial)
- Size Chart and How to Measure (Pactimo) (manufacturer, commercial)
- About Product Size Chart & Measurement (Uniqlo UQ ID customer service) (manufacturer, commercial)
- How to Correctly Measure for Men’s Clothing Sizes (Outdoor Equipped) (retailer, commercial)
FIELD NOTES
Get the Overalls Fit Kit, free.
Your measurement card, the six fit checkpoints and a checklist to take shopping. Join Field Notes for new guides and a say in what Kalm King makes.
THE KALM KING JOURNAL
Continue reading
How Should Men’s Dress Pants Fit? Waist, Rise, Seat and Break
How should dress pants fit? Check the waist, rise, seat, thighs and hem with practical sitting tests, break options and realistic tailoring advice.
How Should a Dress Shirt Fit? A Men’s Guide to Collar, Chest and Sleeves
Check dress shirt fit at the collar, shoulders, chest, sleeves and hem. Learn what to measure, how to test movement and when to try another cut.
Men’s Capsule Wardrobe: How to Build One That Actually Works
A men’s capsule wardrobe is a small set of clothes that all work together. How to choose the pieces, colors and fit, and build one at your own pace.